So you have a fancy new Cloud@Cost [DigitalOcean/Linode] Server, and you want to do something interesting/useful with it. You’ve heard of this cool new tool called docker, but you’re not sure if it’s that useful for you, you mostly play with web development. You’re a big fan of Heroku however, and wouldn’t it be cool if you could do all your prototyping and development in a Heroku-like environment using Docker? Dokku to the rescue.
Ubuntu Version
First thing’s first, lets check what version of Ubuntu we have installed, we want to live on the bleeding edge (LTS) so why not upgrade to the newest version of Ubuntu.
$ cat /etc/lsb-release
DISTRIB_ID=Ubuntu
DISTRIB_RELEASE=13.10
DISTRIB_CODENAME=saucy
DISTRIB_DESCRIPTION="Ubuntu 13.10"
Well that’s no fun. Lets upgrade to 14.04, the new hotness.
$ sudo apt-get update
$ sudo apt-get install update-manager-core
$ sudo nano /etc/update-manager/release-upgrades
Now change normal to lts in opened text file
Prompt=lts
Before we get started, lets poke a hole in our firewall, just for fun. (Mostly because our upgrade is going to occur over SSH, and the installer will open up an additional ssh port as a backup)
iptables -I INPUT -p tcp --dport 1022 -j ACCEPT
Now use one of the following commands to upgrade:
Option1:
$ sudo apt-get update
$ sudo do-release-upgrade -d
Option2:
$ sudo apt-get dist-upgrade -d
Now you can wait for an un-godly amount of time.
Configuring Ubuntu
Its no fun entering passwords all the time, so lets log into our brand new Ubuntu 14.04 machine with a fancy SSH key.
First lets create a new SSH key, just follow the default instructions.
$ ssh-keygen
Now we can see the result in our ~/.ssh folder.
$ ls ~/.ssh/
-rw-------. 1 root root 1675 Jul 27 15:01 id_rsa
-rw-r--r--. 1 root root  406 Jul 27 15:01 id_rsa.pub
Now lets copy our public key over to the Cloud@Cost machine To copy the public key to the machine you want to SSH and fix permissions (you will be prompted for the root password):
$ ssh root@{server ip address} 'mkdir -p /root/.ssh'
$ scp /root/.ssh/id_rsa.pub root@{server ip address}:/root/.ssh/authorized_keys
$ ssh root@{server ip address} 'chmod  700 /root/.ssh'
$ ssh root@{server ip address} 'chmod  600 /root/.ssh/*'
You should now be able to ssh directly from to Cloud@Cost server without providing a password:
$ ssh root@{server ip address}
Dokku for everyone!
Now that we’ve finished with the baby steps, lets get into the meat of the matter. Docker/Dokku!
It starts off simple enough, just run the following command on your Cloud@Cost server.
$ wget -qO- https://raw.github.com/progrium/dokku/v0.2.3/bootstrap.sh | sudo DOKKU_TAG=v0.2.3 bash
Now that Dokku is installed, we have to tell it what domain it’s hosted on. Basically we’ll be accessing our applications on unique subdomains (*.mydomain.com), eg. mygreatapp.thesparktree.com or helloworld.thesparktree.com.
$ echo "thesparktree.com" >> /home/dokku/VHOST
Finally, we need to make sure that we can push code and create apps on our Dokku service. We’ll need to add our ssh key to the Dokku user, and specify a short descriptor for our key (eg. dokkukey). On our host machine, run the following:
$ cat ~/.ssh/id_rsa.pub | ssh root@{server ip address} "sudo sshcommand acl-add dokku {key name/descriptor}"
Plugins
The best part about being a developer is being able to steal reuse other developers code. Dokku has a pretty vibrant plugin ecosystem, and we’ll install a few of my favorite plugins below. You can see the full list of plugins here
All plugins live in the same folder.
$ cd /var/lib/dokku/plugins
$ git clone https://github.com/petercip/dokku-pg-plugin.git postgresql
# the following repo only works with postgres 9.1 - https://github.com/jeffutter/dokku-postgresql-plugin postgresql
$ git clone https://github.com/cedricziel/dokku-deployment-keys.git /var/lib/dokku/plugins/deployment-keys
...other plugins here...
$ dokku plugins-install
Deploy an app
Now that Dokku is all setup, we can push our web app to Dokku. Make sure you don’t have any spaces in your {dokku remote name} or {application name}.
$ cd node-js-sample
$ git remote add {dokku remote name} dokku@{server ip address}:{application name}
$ git push {dokku remote name} master
You can now see your application’s url by typing:
$ dokku url {application name}
Lets start up the postgresql container.
$ dokku postgresql:create {application name}
$ dokku postgresql:link {application name} {application name}
Setting Environmental variables.
You have your app running pushed to Dokku, but it’s not working (of course its not, when has something ever worked the first time). Lets set some of the required environmental variables that your app needs to work properly.
$ dokku config <app> # display the config vars for an app
$ dokku config:get <app> KEY 3 display a config value for an app
$ dokku config:set <app> KEY1=VALUE1 [KEY2=VALUE2 ...] # set one or more config vars
$ dokku config:unset <app> KEY1 [KEY2 ...] # unset one or more config vars
so we could do something like:
$ dokku config:set {application name} NODE_ENV=development
Adding SSL
But wait, something’s wrong. Where’s that green lock in the corner of your browser… without it, how are you going to stop the hackers and the NSA from breaking into your Twitter clone? Don’t worry, I got you covered.
Since this is just a web server for testing applications, lets assume you can get away with a simple SSL cert. Possibly even one that expires yearly. Check out StartSSL for a free SSL certificate.
This SSL guide has some good instructions under the SSL section. At the end of the process you should have the following files:
secure.key - The unencrypted version of your private key (be very careful no one else has access to this file!)
secure.key.secure - The encrypted version of your private key (does not need to be copied to server)
server.csr - Your new certificate (bundle)
If you had any intermediate certificates, you should just concatenate them to the server.csr file to create a certificate bundle.
Now copy the secure.key and server.csr to the /home/dokku/{application name}/tls folder on your cloud@cost server. Create the tls folder if it doesn’t exist. Rename the secure.key file to server.key and rename the server.csr to server.crt
$ ls -al
-rw-r--r-- 1 dokku  dokku  7241 Jun 15 12:58 server.crt
-rw-r--r-- 1 dokku  dokku  1676 Jun 15 12:58 server.key
Redeployment of the application will be needed to apply TLS configuration. Once it is redeployed, the application will be accessible by https:// (redirection fromhttps:// is applied as well).
Continuous Deployment.
So you’ve gotten through this wonderful guide, and you’re thinking.. Its a sunday night, and I still have some time to kill. That’s great. Let’s finish up by setting up continuous deployment for our application using Wercker. Wercker is a SAAS similar to CircleCI, TravisCI and Jenkins. The nice thing about Wercker is that it has free accounts with the limitation that only one build can occur at a time.
There’s no need to walk you through creating an account with Wercker. Wercker is based around a werker.yml file that you add to your project root. Here’s what mine looks like.
box: wercker/nodejs
# Build definition
build:
  # The steps that will be executed on build
  steps:
    # A step that executes `npm install` command
    - npm-install
    # A step that executes `npm test` command
    - npm-test
    # A custom script step, name value is used in the UI
    # and the code value contains the command that get executed
    - script:
      name: echo nodejs information
        code: |
          echo "node version $(node -v) running"
          echo "npm version $(npm -v) running"
deploy:
  steps:
    - add-to-known_hosts:
        hostname: $SERVER_HOSTNAME
    - add-ssh-key:
        keyname: DOKKU
    - script:
        name: Initialize new repository
        code: |
          rm -rf .git
          git init
          git config --global user.name "wercker"
          git config --global user.email "pleasemailus@wercker.com"
          git remote add dokku dokku@$SERVER_HOSTNAME:build
    - script:
        name: Add everything to the repository
        code: |
          git add .
          git commit -m "Result of deploy $WERCKER_GIT_COMMIT"
    - script:
        name: Push to dokku
        code: |
          git push dokku master -f
The wercker.yml file is broken up into two parts, the build and deploy sections. This wercker.yml file is for a node application. Once the build finishes, and the tests pass, the application deploys to our Dokku server, automatically.
I’m going to assume that you’ve already connected your bitbucket/github account, and added your project. Lets jump straight into the configuration.
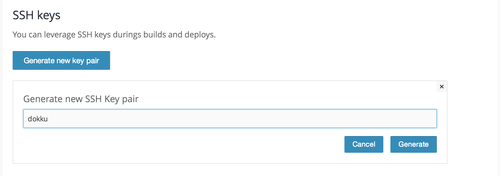
First lets got to the settings tab, and add a new SSH key. Wercker will generate the private key pair for us, we just have to name the key, and copy the public key that they give us.
We can then add the key to our Dokku server by modifying the authorized_keys file or using sudo sshcommand acl-add dokku {key name/descriptor}
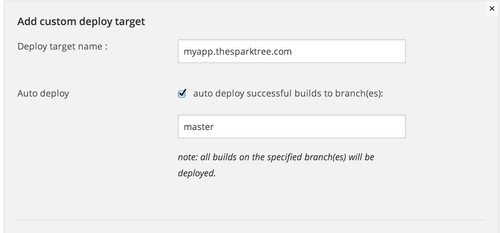
Then, we should add a new Deploy Target to our Wercker project, pointing to our Cloud@Cost server. Select Custom deploy from the dropdown.
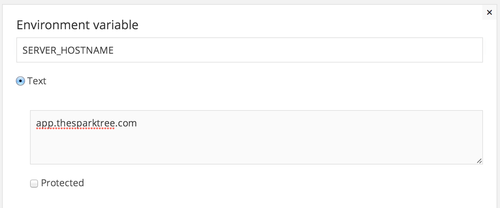
Create a new environmental variable called SERVER_HOSTNAME and specify your dokku server hostname or ipaddress.
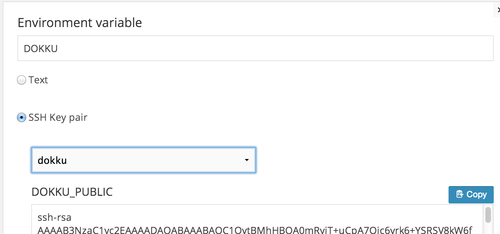
Create one more environmental variable called DOKKU and point it to the SSH keypair you created earlier
Make sure you hit the Save button, otherwise Wercker will ignore your configuration changes.
Now make a test commit to your master branch, and push it to github/bitbucket. Your commit should automatically deploy via Wercker to your Dokku box.