Jenkins is one of the most popular Continuous Integration servers ever. It supports an absurd amount of languages, frameworks, source code management systems and tools via plugins maintained by its active community.
As your application and deployed infrastructure becomes more complex, you’ll need to re-assess your CI/CD tool chain to keep up. Natively, Jenkins supports the concept of slave machines to distribute your testing and automation, leaving the Jenkins master as the orchestrator for your jobs.
This works great in theory, however now there’s an additional management overhead keeping the slave nodes up-to-date with the software required for your jobs. Under/over utilization also becomes a problem. Your peak job load may differ significantly from your baseline, meaning that lots of resources are wasted, or your slaves just can’t keep up with the number of jobs in the queue, delaying your builds & tests.
Adding Docker & Kubernetes to the mix fixes those limitations, an allows your CI/CD infrastructure to scale with ease.
This post is part of a series that is all about solving common problems using new Jenkins features, modern automation & configuration-as-code practices.
- Part 1 - Automated Jenkins Install using Chef
- Part 2 - Maintainable Jenkins Jobs using Job DSL
- Part 3 - Leveraging Pipelines for Continuous Deployment/Orchestration
- Part 4 - Kubernetes Slave Cluster
Requirements
I’m assuming that you already have a working (and accessible):
- Kubernetes cluster
- A cloud provider managed cluster (like EKS/AKS) is preferable, but not required.
masternodes/API needs to be accessible via Jenkinskubectlshould be configured to communicate with your cluster
- Jenkins server (v2.199+)
- You’ll also need to install the Kubernetes Plugin for Jenkins (v1.24.0+)
If you want to follow along at home, but you don’t have a dedicated Kubernetes cluster or Jenkins server, you can spin up a Dockerized lab environment by following the documentation on the following repo.
Once you’ve completed the steps in that README, just come back here and follow along.
Configure your Kubernetes Cluster
Before we start configuring Jenkins, we’ll need to ensure that our Kubernetes cluster has some basic configuration.
Jenkins Namespace
We should create a Jenkins specific namespace on our Kubernetes cluster, so we can isolate pods created from our Jenkins server from other workloads running on our cluster.
$ kubectl create namespace jenkins-kube-slaves

namespace/jenkins-kube-slaves created
Note: If you’re planning on sharing this Kubernetes cluster with different Jenkins servers, you should probably use a unique namespace for each.
Optional - Docker Registry Authentication
This section is optional, and only required if you use a private registry, or have private images on Docker hub
If your team uses a private Docker registry to store your images, you’ll need to tell Kubernetes how to authenticate against it. This is done using a Kubernetes secret.
  kubectl create secret docker-registry docker-registry-auth-jenkins \
  --namespace="jenkins-kube-slaves" \
  --docker-server=https://index.private-registry-hostname.com \
  --docker-username=myusername \
  --docker-password=mypassworrd \
  --docker-email=myemail@corp.example.com
Note: you can use https://index.docker.io/v1/ if you use Docker Hub with private images.
You’ll want to deploy a pod to the jenkins-kube-slaves namespace manually to ensure that the credentials are valid.
Convert Kubernetes Client Config to PFX
The Kubernetes Plugin for Jenkins requires a *.pkf formatted certificate authenticating against the Kubernetes API,
rather than the standard kubectl config file format (~/.kube/config).
You can generate a *.pkf file by running the following commands
$ mkdir -p /tmp/kube-certs
$ cd /tmp/kube-certs

$ grep 'client-certificate-data' ~/.kube/config | head -n 1 | awk '{print $2}' | base64 -d >> client.crt
$ grep 'client-key-data' ~/.kube/config | head -n 1 | awk '{print $2}' | base64 -d >> client.key

# generate pfx file
$ openssl pkcs12 -export -clcerts -inkey client.key -in client.crt -out client.pfx -name "kubernetes-client" -passout pass:SECRET_PASSPHRASE

# you should now have 3 files in your /tmp/kube-certs directory
$ ls
client.crt    client.key    client.pfx
You can validate that your generated *.pfx file worked by querying the kubernetes cluster API with it.
# first we'll verify that the cert and key were extracted correctly
curl --insecure --cert client.crt --key client.key  https://KUBERNETES_APISERVER_HOSTNAME:PORT/api/v1

# next we'll validate that the generated .pfx file that Jenkins will use is correctly encoded.
curl --insecure --cert-type P12 --cert client.pfx:SECRET_PASSPHRASE https://KUBERNETES_APISERVER_HOSTNAME:PORT/api/v1
Note: the
SECRET_PASSPHRASEvalue above should be replaced and treated as a password. The*.pfxpassphrase is used to encrypt the*.pfxfile contents before storing them on disk.
Now that we’ve configured our Kubernetes cluster, its time to setup Jenkins
Configure Kubernetes Jenkins Plugin
The Kubernetes plugin is fairly complicated at first glance. There’s a handful of settings that must be set for everything to work correctly. If you’re following along, you’ll want to pay close attention to the screenshots below.
Add Jenkins Certificate Credential
The first thing we’re going to need to do is add store our generated client.pfx file as a Jenkins Certificate Credential,
so we can reference it in the Kubernetes plugin configuration.
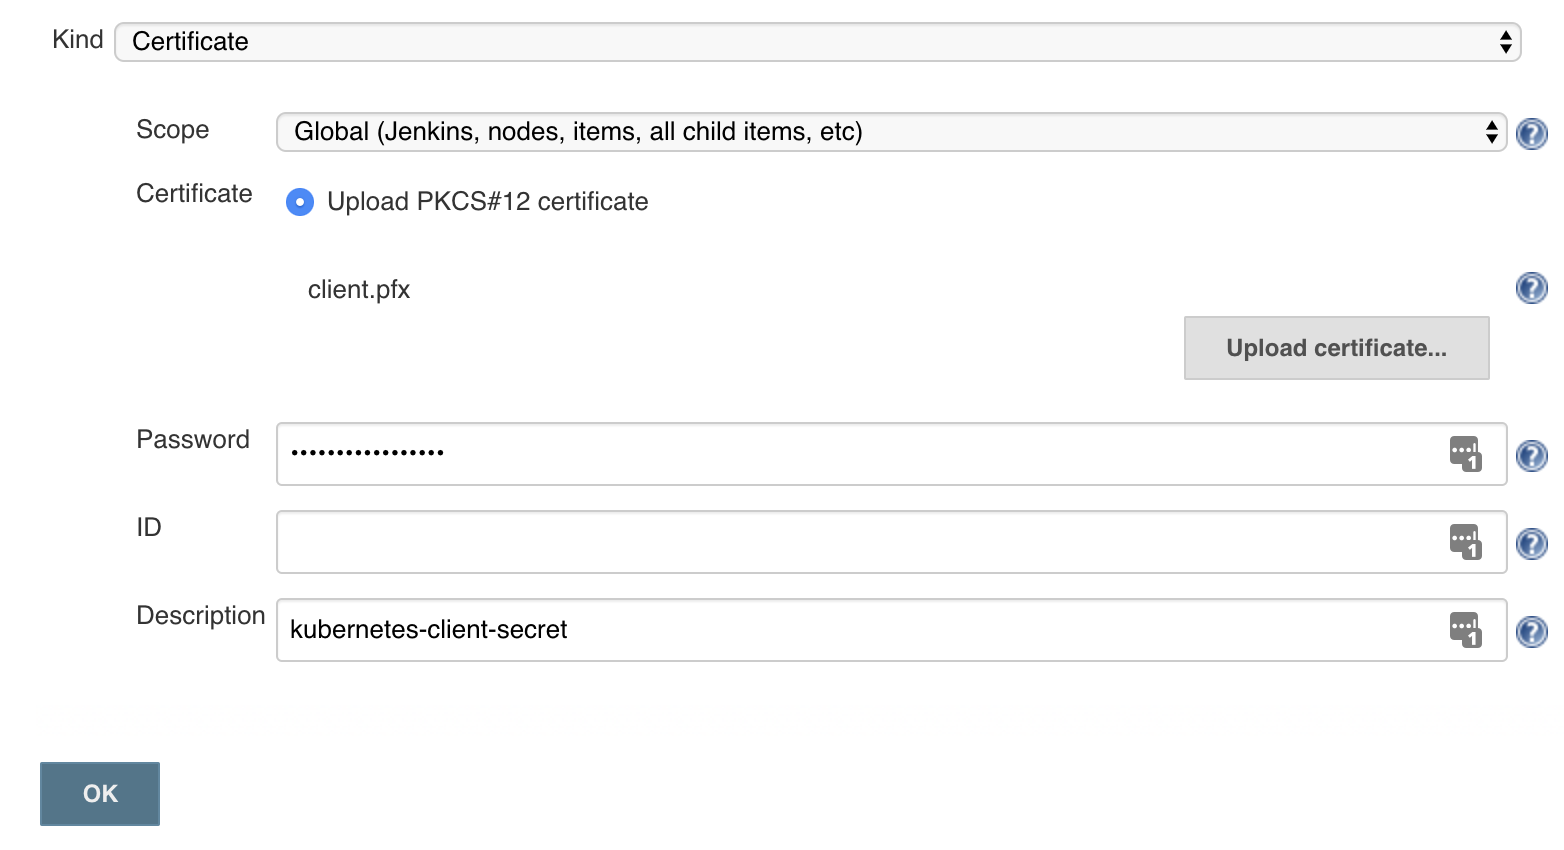
Note: You must specify the same
SECRET_PASSPHRASEyou used when generating your*.pfxfile above.
Add Kubernetes Cloud
Now we can finally start configuring our Jenkins server to communicate with our Kubernetes cluster.
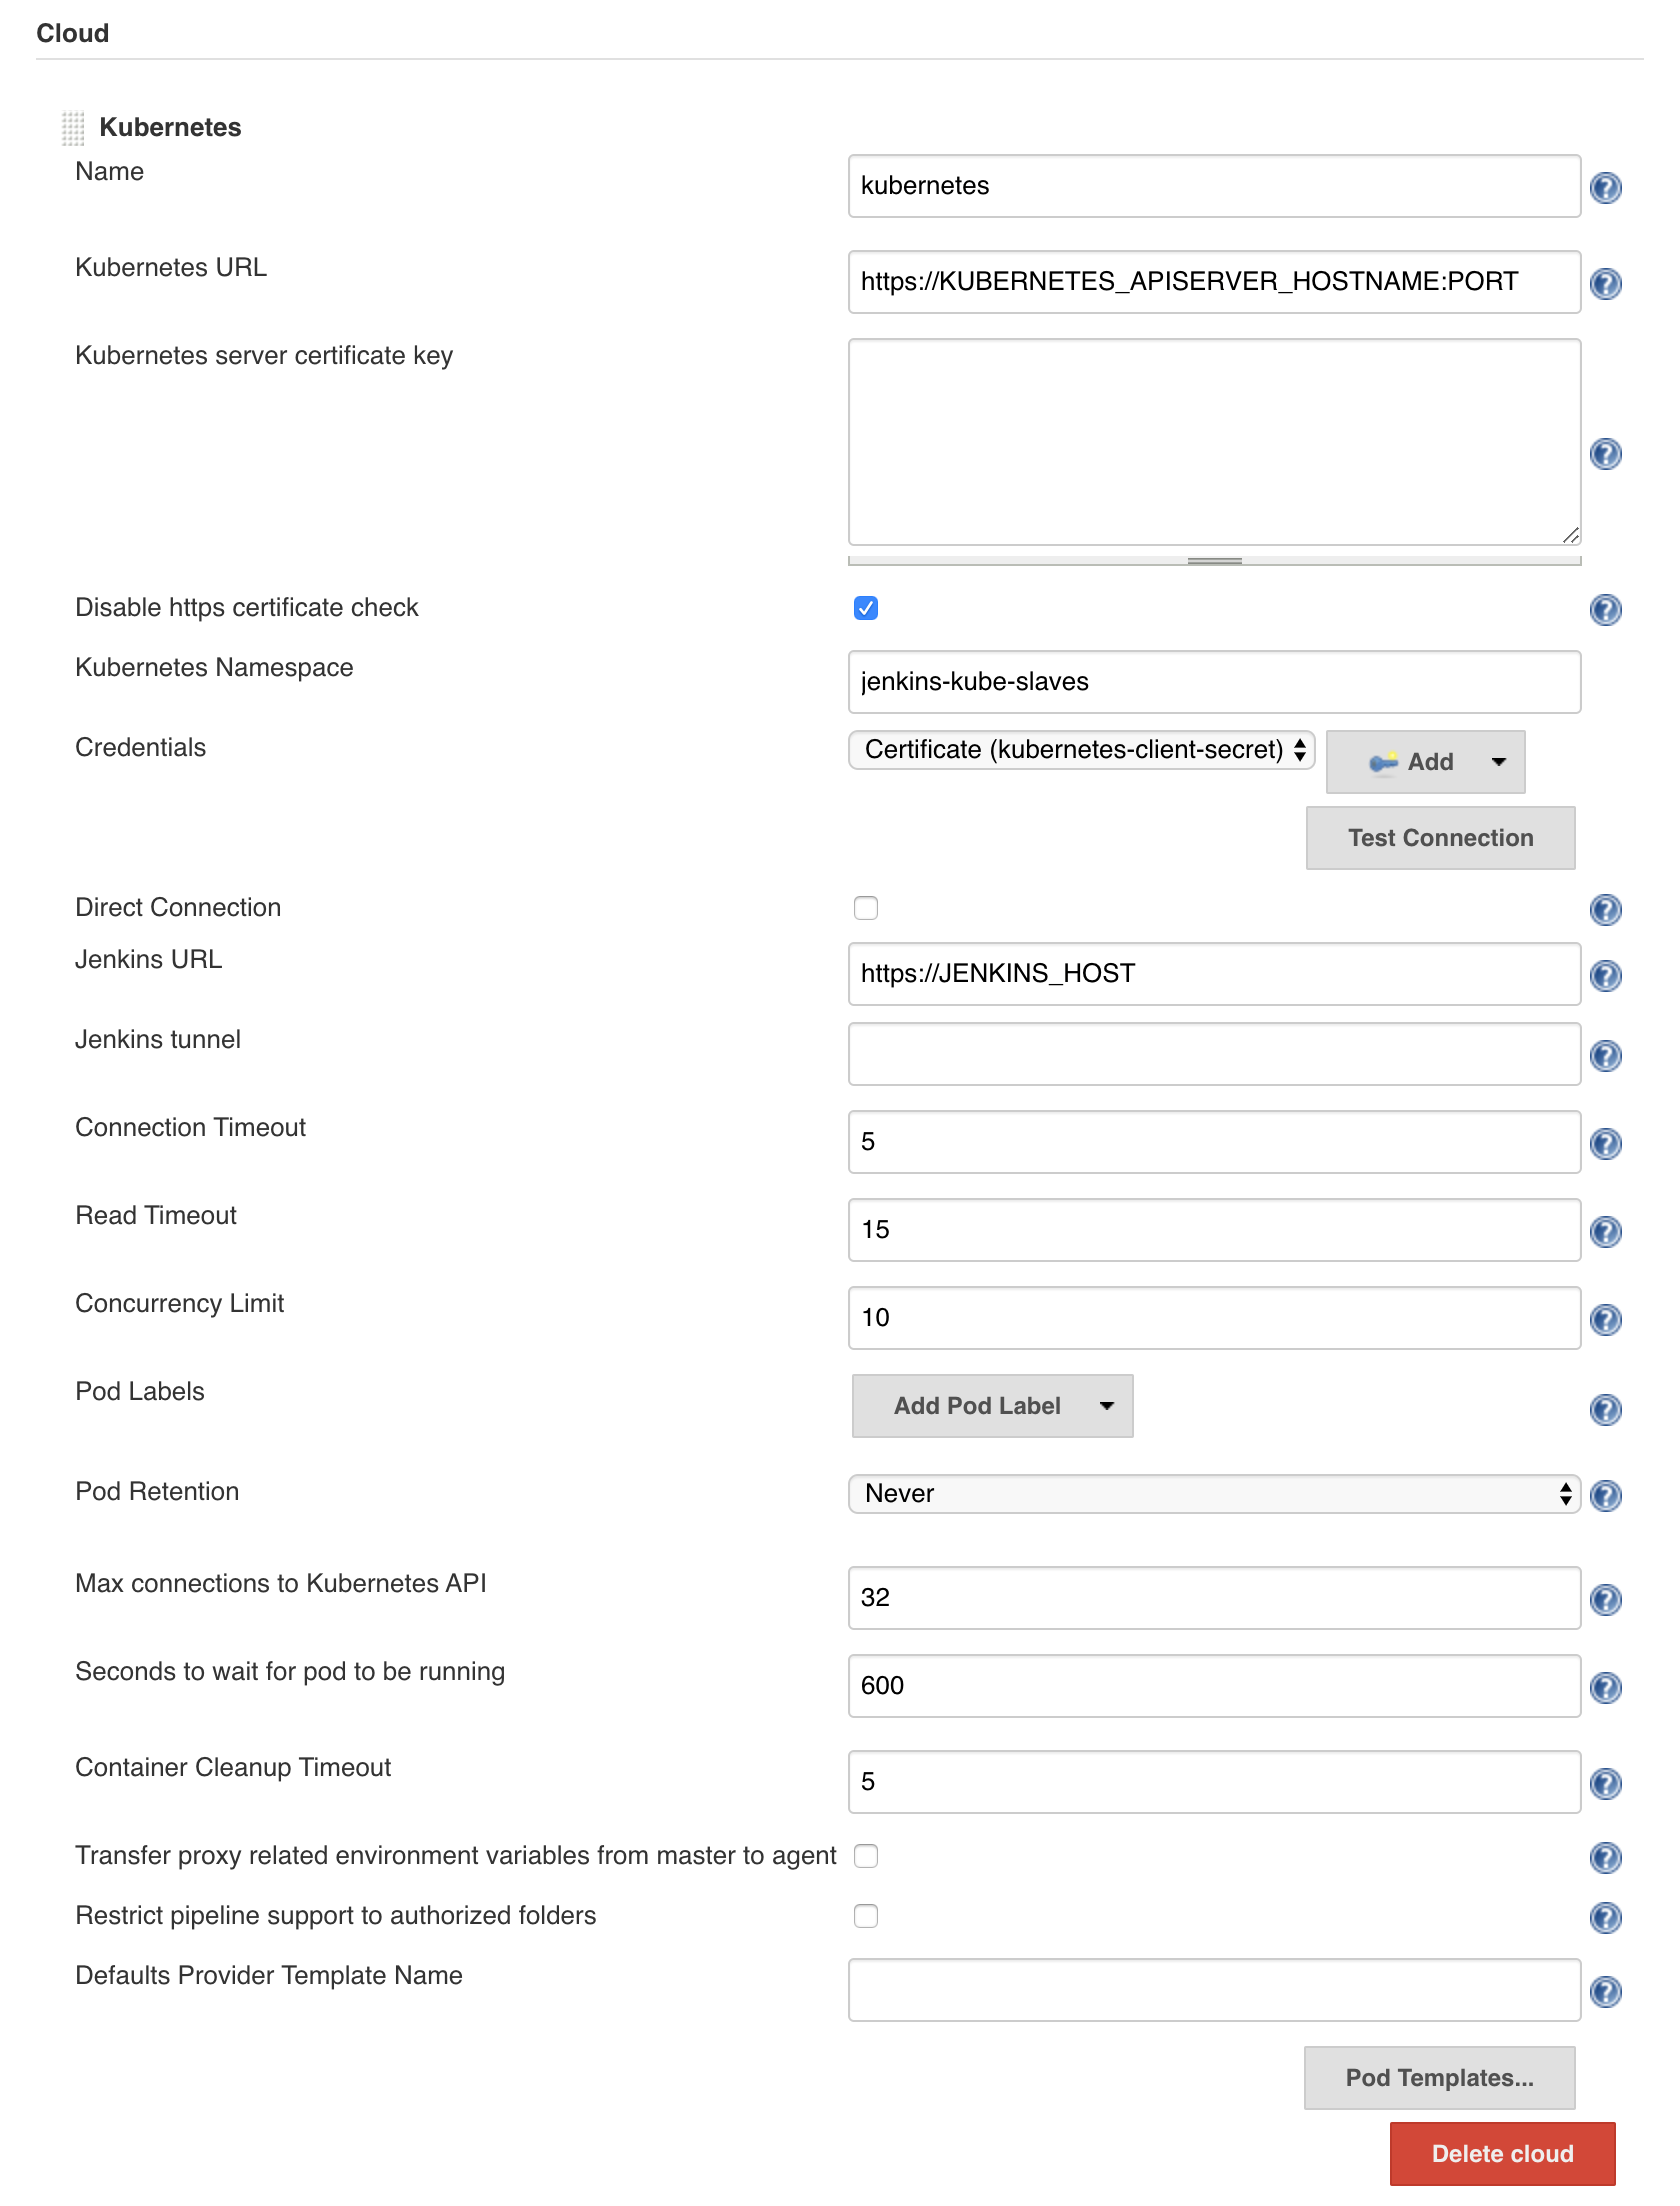
Note: in the screenshot above, I’ve disabled the “https certificate check” for testing. You’ll want to make sure that’s enabled in production. When you do so, you’ll need to specify your Kubernetes server CA Certificate key in the box above.
Note: if you’re using my AnalogJ/you-dont-know-jenkins-dynamic-kubernetes-slaves repo, you will need to set the Jenkins Url to “http://localhost:8080” (not https://)
Testing
A this point we have finished configuring the Kubernetes plugin, and we can test it out by creating a simple Jenkins Pipeline job, with the following script.
podTemplate(containers: [
    containerTemplate(name: 'maven', image: 'maven:3.3.9-jdk-8-alpine', ttyEnabled: true, command: 'cat')
]) {

    node(POD_LABEL) {
        git 'https://github.com/jenkinsci/kubernetes-plugin.git'
        container('maven') {
            sh 'mvn -B clean install'
        }
    }
}
This method allows you to define your pod and containers on demand, however it does not work with older Jenkins Freestyle jobs.
Global Template Configuration
Before discuss how to get the Jenkins Kubernetes plugin working with Freestyle jobs, we should first recap how the Jenkins slave agents work.
Jenkins Agent Recap
Jenkins communicates with its slaves using a Jenkins agent (using a protocol called jnlp). The logic for this agent is packaged into a jar and
automatically installed on your Jenkins slave node when you register the slave with the Jenkins master.
This agent software is also required for the dynamic Kubernetes slaves, however in this case it’s baked into the docker image that is automatically included in every pod you run.
The default agent (based on the jenkins/inbound-agent image) can be customized by adding it to the template:
containerTemplate(name: 'jnlp', image: 'jenkins/inbound-agent:3.35-5-alpine', args: '${computer.jnlpmac} ${computer.name}'),
This default agent image is based on Debian, but Alpine and Windows Nanoserver flavors exist as well.
The Problem
While Pipeline jobs are flexible and have a syntax to configure the Kubernetes pod used in the job, there’s no equivalent in for Freestyle jobs. The naiive solution would be to use the a global Pod Template, and reference it via a job “label”

However this is not usable for most Freestyle jobs.
When used with a Freestyle job, the Kubernetes plugin will run the job steps in the default Pod container, the jnlp
slave agent container. Which is where we run into the main issue: The jnlp slave agent container is based on a minimal
image with no language runtimes.
The Solution
Custom Agent Images
The solution is to customize the jnlp slave image container with the custom software your jobs require – language
runtimes, tools, packages, fonts, etc.
Since jenkins/inbound-agent is just a standard Docker image, you can customize it like you would any other Docker image.
Here’s an example Dockerfile adding the Go language runtime to the jenkins/inbound-agent image, so you can use go build
in your Jenkins jobs
FROM jenkins/inbound-agent

# the jenkins/inbound-agent is configured to run as the `jenkins` user. To install new software & packages, we'll need to change back to `root`
USER root


# lets download & install the latest Go language runtime and tools.# since this is a debian machine, we can also install standard packages using `apt-get`
RUN curl -O --silent --location https://dl.google.com/go/go1.13.10.linux-amd64.tar.gz && \
    mkdir -p /usr/local/go && \
    tar -xvf go1.13.10.linux-amd64.tar.gz -C /usr/local/go --strip 1 && \
    rm -f go1.13.10.linux-amd64.tar.gz

# lets setup some Go specific environmental variables
ENV GOROOT="/usr/local/go" \
    GOPATH="/home/jenkins/go"

# next, we'll customize the PATH env variable to add the `go` binary, and ensure that binaries on the GOROOT and GOPATH are also available.
ENV PATH="$PATH:/usr/local/go/bin:$GOROOT/bin:$GOPATH/bin"

# now that we've finished customizing our Jenkins image, we should drop back to the `jenkins` user.
USER jenkins

# finally, we'll setup the `go` cache directory (GOPATH), and test that the go binary is installed correctly.
RUN mkdir /home/jenkins/go && \
    go version
Once you push this up to your Docker registry, you we can reference it in a global Pod Template, with a label like kube-slave-go or maybe kube-slave-go1.13 if you care about the specific version of the language runtime.
While you could go off and build custom Docker images for all the languages you use, I’ve already created jenkins/inbound-agent based Docker images for most popular languages (go, ruby, node, python). Feel free to use them if you’d like.
Configure Global Pod Templates
To use our customized jnlp slave images with Freestyle jobs, we’ll configure a handful of global Pod Templates, to look like the following:
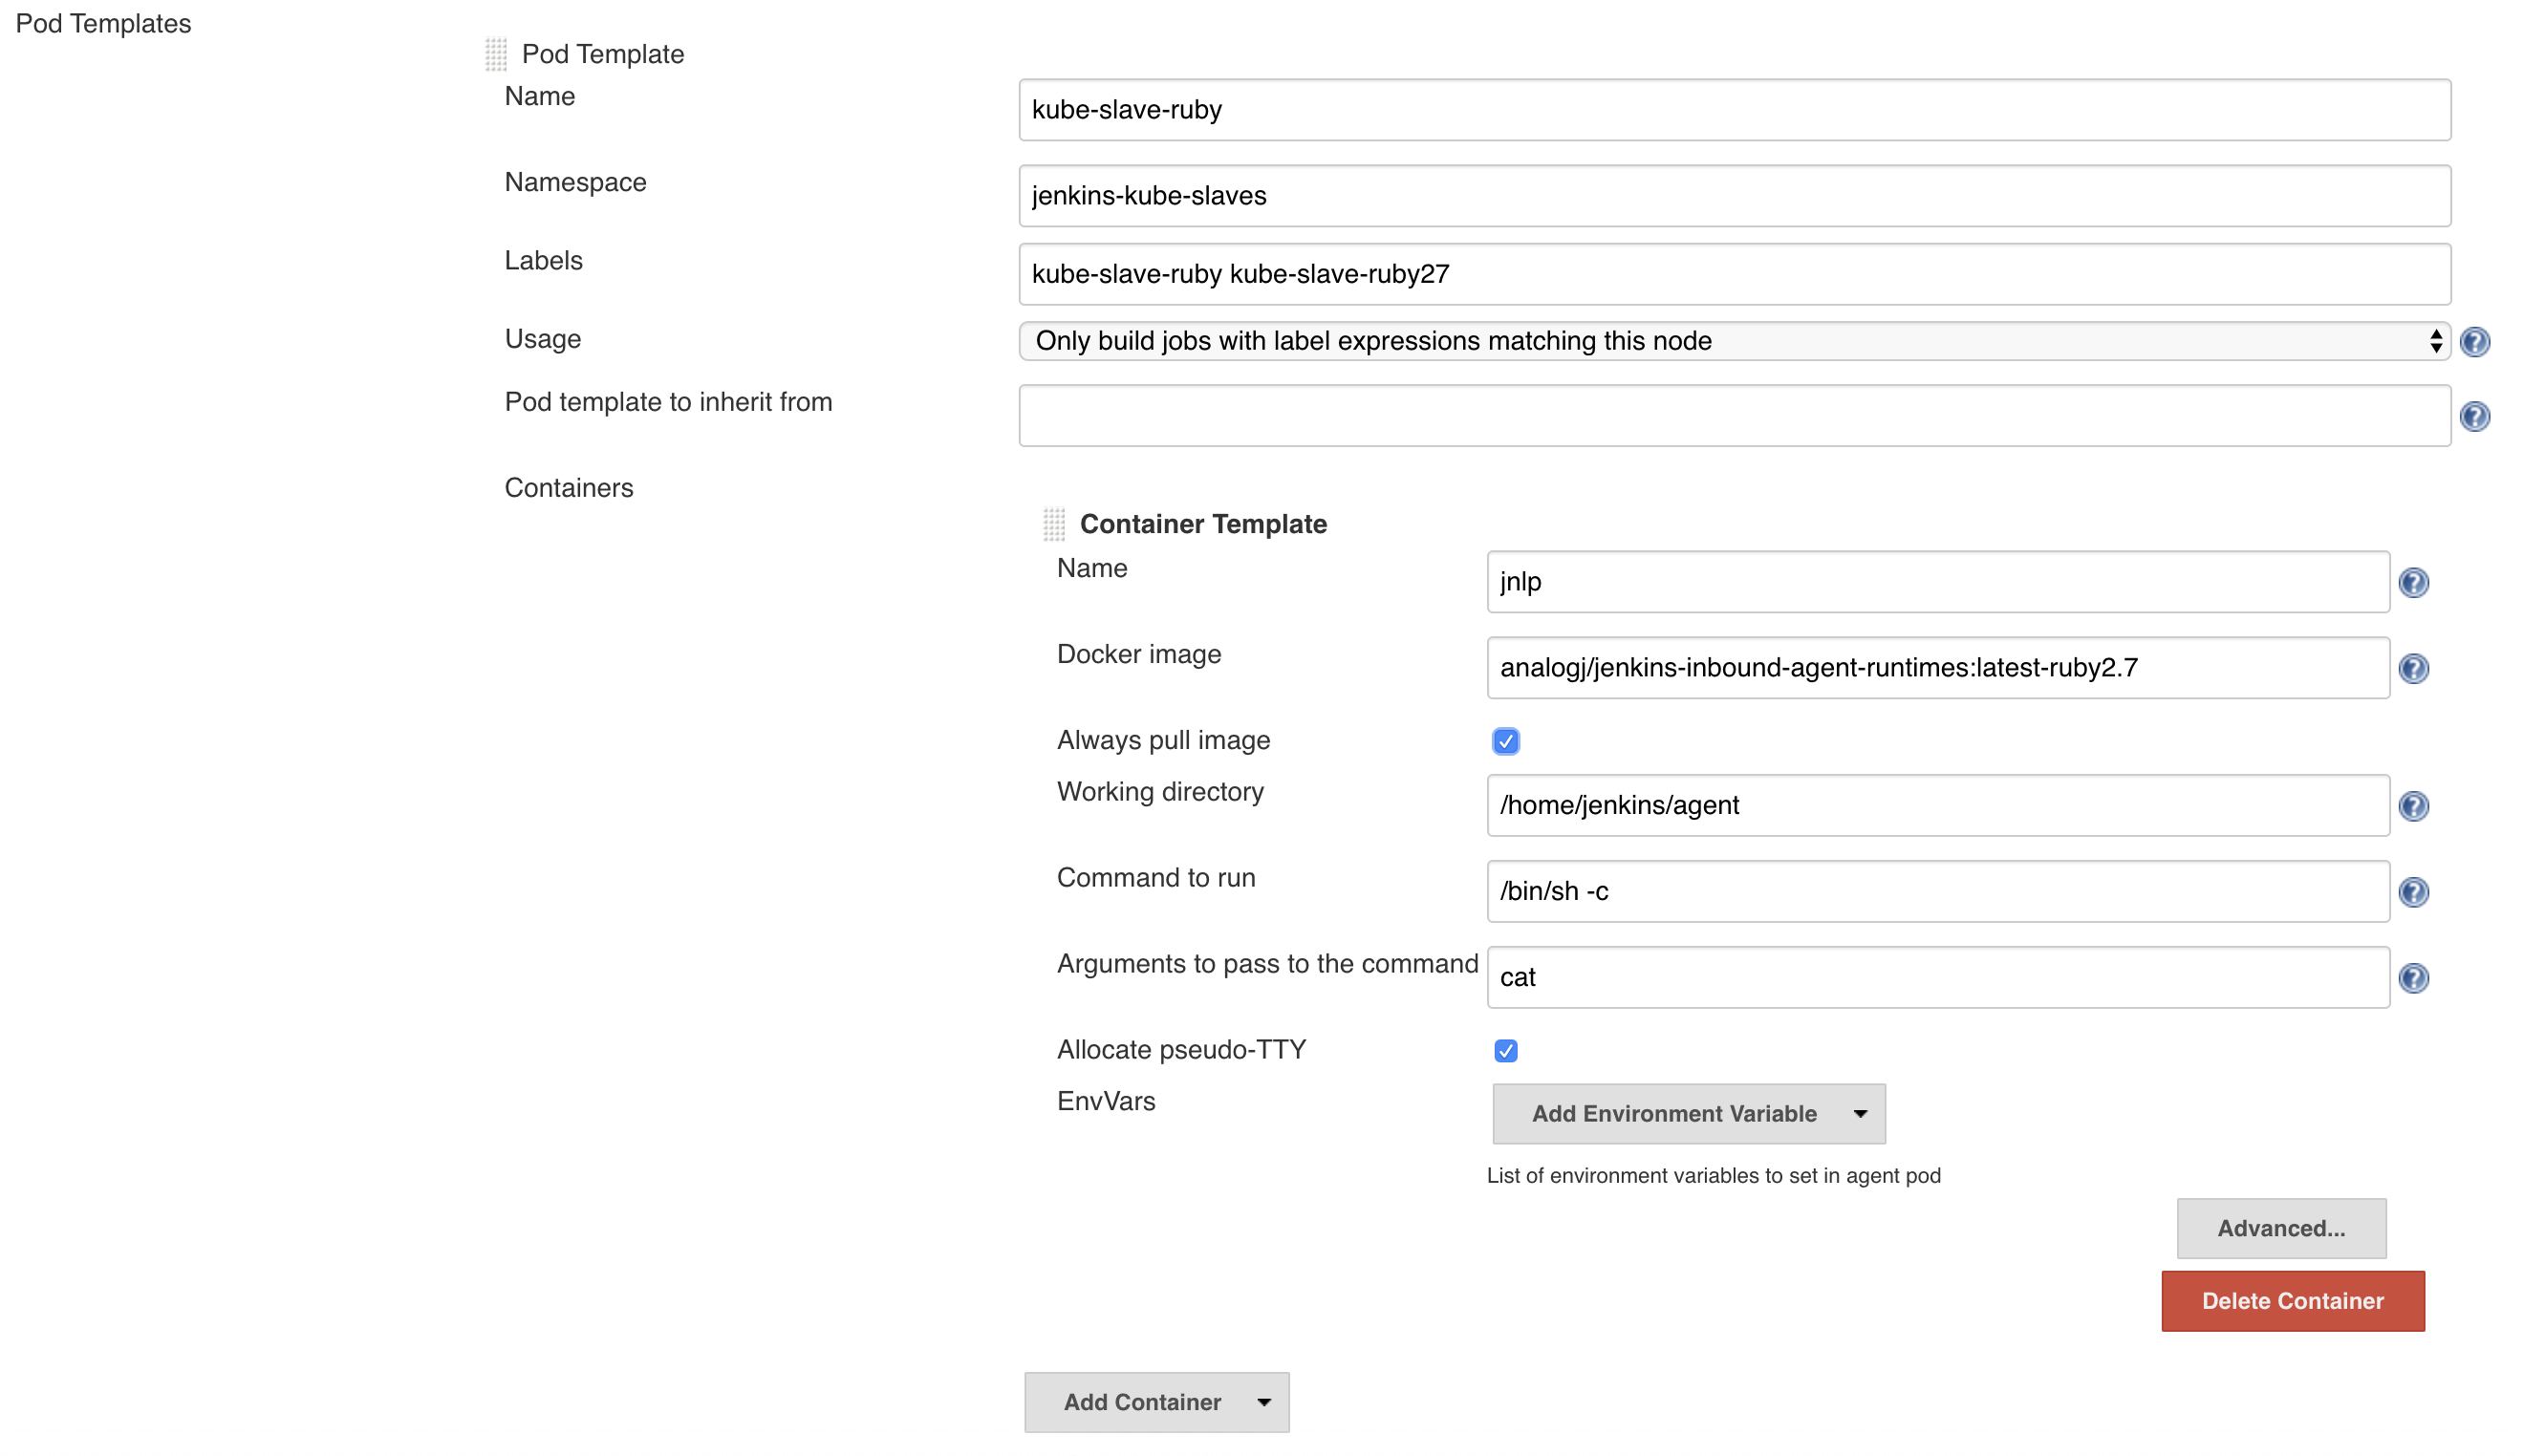
The fields to pay attention to are the following
- Namespace - this determines the namespace that Jenkins uses when it creates slaves on demand.
- Label - the most important field. The label(s) you specify here will be used in your Jenkins jobs to assign them to this dynamic slave. We’ll call ours
kube-slave-ruby. - Container Template - Name - this must be
jnlpto tell Jenkins to override the default minimal slave agent image. - Docker Image - as mentioned above,
analogj/jenkins-inbound-agent-runtimes:latest-ruby2.7is customized version of thejenkins/inbound-agentimage with Ruby installed. Replace with your customized image with the tools you need. -
Optional - ImagePullSecrets - only required if you use a private Docker registry, or private Docker Hub images. Should have the exact name used in the Docker Registry Authentication section above.

Configure Jobs
Now that we have our Kubernetes plugin fully configured, its time to start running our Jenkins jobs on our cluster.
Though Jenkins has a multitude of different job types, they’re all fundamentally based on one of the two core job types:
- Freestyle jobs
- Pipeline jobs
Freestyle Jobs
Lets look at freestyle jobs first. They’ve been around the longest, and most other job types can be configured in the same way.
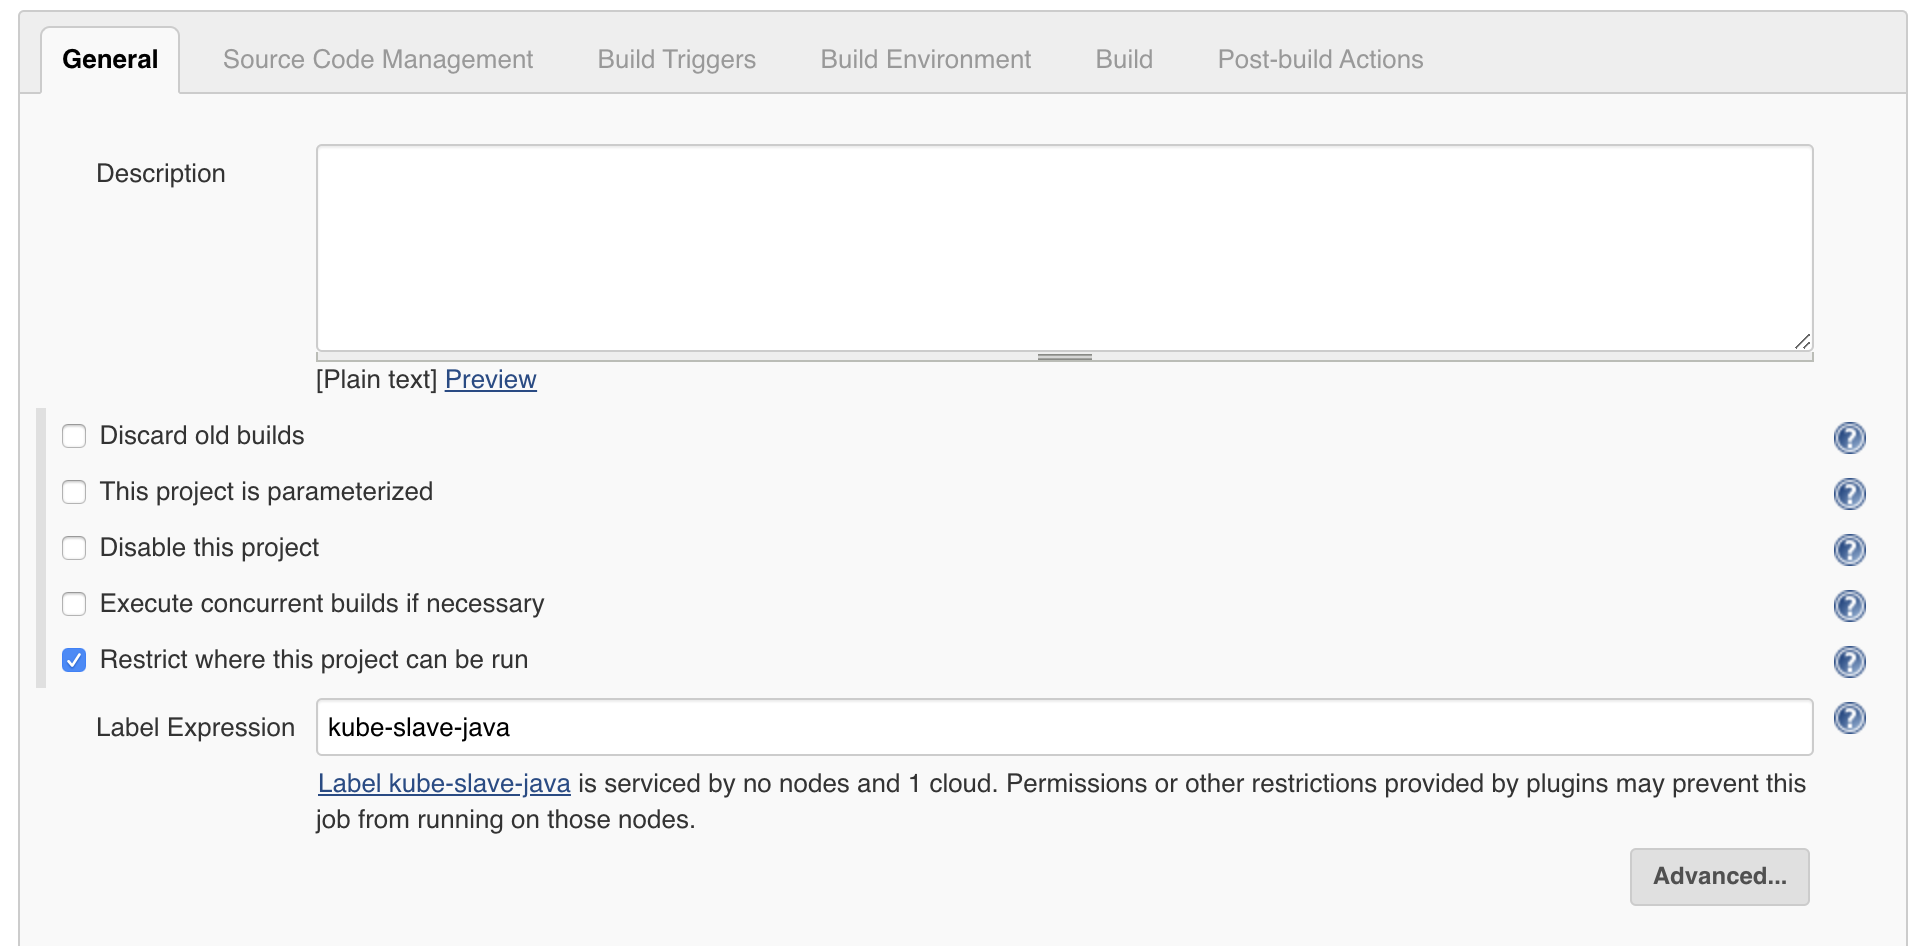
As mentioned above, with Freestyle Jobs (and other legacy job types) you cannot configure your Kubernetes pod per job. You’re limited to the global pod templates you’ve pre-configured.
Pipeline Jobs
Similar to Freestyle jobs, running your job on the Kubernetes cluster is as simple as specifying it in the node{} code block
node('kube-slave-java') {
    # the following commands will execute in the specified docker container on your kubernetes cluster,
    sh 'echo "hello world"'
}
However, Pipeline jobs provide additional flexibility, allowing you to define the Pod template in the job itself, allowing for much more flexibility (including running multiple containers in a pod)
podTemplate(containers: [
    containerTemplate(name: 'maven', image: 'maven:3.3.9-jdk-8-alpine', ttyEnabled: true, command: 'cat'),
    containerTemplate(name: 'golang', image: 'golang:1.8.0', ttyEnabled: true, command: 'cat')
  ]) {

    node(POD_LABEL) {
        stage('Get a Maven project') {
            git 'https://github.com/jenkinsci/kubernetes-plugin.git'
            container('maven') {
                stage('Build a Maven project') {
                    sh 'mvn -B clean install'
                }
            }
        }

        stage('Get a Golang project') {
            git url: 'https://github.com/hashicorp/terraform.git'
            container('golang') {
                stage('Build a Go project') {
                    sh """
                    mkdir -p /go/src/github.com/hashicorp
                    ln -s `pwd` /go/src/github.com/hashicorp/terraform
                    cd /go/src/github.com/hashicorp/terraform && make core-dev
                    """
                }
            }
        }
    }
}
For a full list of options for the podTemplate and containerTemplate functions, see the Jenkins Kubernetes Plugin README.md
Fin.
That’s it. You should now have a working Jenkins server that dynamically creates slaves on demand. Jenkins Kubernetes slaves can be configured with all the same software you would need on a regular slave, with the added benefit of following configuration-as-code best practices.
In addition, it’s generally easier to automate scaling up your Kubernetes cluster, than it is to scale up Jenkins nodes.